This tutorial showes you how to set up Aweber email marketing autoresponder software. It shows you every aspect of set up, from creating your form for placing on your website, to creating your very first email, setting up your first campaign and sending broadcast messages. It is taken from my More Clients Academy which provides training and tutorials on every kind of marketing that a business owner needs to grow a thriving business.
You know that my aim with the More Clients Academy is to get more clients coming to you consistently.
There is one tool in my business that I simply could not be without and I know it could or should be the same for your business too.
This tool is my email marketing software, which allows me to automate and leverage my marketing to such a level of success that I estimate it is responsible for 80% of my business income.
80% of my new business income all from a good old email list.
Whilst everyone out there in the marketing world is always trying to ‘sell you’ their new fangled marketing tool, I stick to what has and always will work: ‘easy life client attraction’.
Nothing fits this bill more than Email marketing.
In this More Clients Academy Tutorial, I show you, step by step, how to set up your email marketing the easy way.
If you haven’t yet signed up for Aweber, you can do so here:
Click here to sign up to Aweber:>>
Please don’t skip a part of this Aweber tutorial.
I have put it together in the most logical order possible and all of the parts are required to get you up and running in a way that makes the best use of this automated and leveraged marketing tool.
Shall we begin?
Step 1 – Basic Set Up
This is where you set up the basics of your email marketing database.

Each number below refers to the number on the image above:
1 – Your law firm name. This is how you want people to see it whenever it is displayed, so ensure that you enter it correctly.
2 – Your website URL.
3 – Your contact address will be pulled through from your billing. If you need to use a different address, this is your chance to change it.
4 – This is how you would like your name to be displayed to your email recipients – for me it would be ‘Nick Jervis’.
5 – This is the reply address that responses to your emails will come to. It should be yours or your Personal Assistants if you have one and are happy for him or her to manage these emails. Personally, mine come to me as I like to see what my prospects are saying.
Next, we need to give your Aweber email marketing list a name that works for you and for your audience.

1 – Over the years I have developed a system that works for me which I am happy to share with you. The reason that I have done this is that the List Name must be unique across ALL of Awebers’ clients. I use my business initials followed by a descriptive name for me to remember so it might be npj-more-clients-academy. I always use lower case just because that was what I was trained to do when coding websites back but you do not have to.
2 – This can be seen by your recipients, so ensure you add a value of them signing up to this list here rather than simply saying “My Monthly Emails”. Instead, for a Nurture List you might put here “Free Guide To YOUR SERVICE” or for a Now List you might put “Saving clients time and money with our XXX advice”. Think of the benefit to your client in parting with their email address and you won’t go far wrong here.
This section does require some adjusting. If you leave it as Aweber intended, hardly anyone will add themselves to your list in the future.
What you are preparing here is the very first email that your clients receive from you when you add them to your database.
It is even more important than that in that Aweber has always been double opt in – which is great from a GDPR perspective – in that users have to do the following to go onto your email marketing list:
- Ask to go onto your list (either on the telephone or on a form on your website); and
- Click the link in this email to get onto your list.
Hopefully that explains why this needs a little bit of attention. So, onto each numbered point of this image:

1 – “Subscription” is a dreadful word in marketing terms. It screams “money” and “they’re going to sell to me”. This is not what you want your clients to be thinking. I have used the same wording for years. Click on Request a custom subject line and enter this: “Response required. Please confirm your email address.”
2 – To encourage as many people as possible to click this link, change the wording to “Please click the button below to confirm your email address:”
3 – Change from “Confirm my subscription” to “Confirm my email”.
4 – Click “Complete set up” and step one is now finished.
The next box that you will be presented with is this one:

I want you to ignore this one for now, and instead follow the steps below.
First, let me outline the entire process before taking you through each step, so that it makes sense in the bigger scheme of things.
Remember the two different ways that you are going to use your email marketing software will depend on whether you are a Marketing DNA Now or Marketing DNA Nurture (Module 1 from The More Clients Academy).
For those not yet members of The More Clients Academy (you should be by the way), a Marketing DNA Now business is a service business where people make an immediate enquiry for your services from your website. They have a ‘pressing need’ which they would like to fix now. This would include businesses like house removal companies, estate agents, crisis management PR companies etc.
Marketing DNA Nurture businesses are more like my marketing consultancy service. People research around a topic, for example, how to attract more clients, and are far more likely to download a free guide or training on that topic than they are to call someone to ask them to do it for them. These businesses must offer an ‘item of value’ to anyone visiting their website which they will send in exchange for their email address.
Below is the entire process summary for each type of Marketing DNA so that you can see this in action.
Marketing DNA Now Businesses Marketing Process To Implement

It is an easier process for Marketing Now leads because you don’t necessarily need a free guide in exchange for their email address: remember that your primary objective is to get prospects calling you when they are ready to buy your services, so your use of email marketing here is to ensure that you have more than one method of following up (your email marketing) and for the future that they remain on your email list so that you can cross sell to them effortlessly and encourage referrals from them.
Therefore, you will be adding clients to your email marketing list when you have your first conversation with them using this wording to increase the chances of them clicking the double opt in link:
“I have just sent you an email to confirm that I have the correct email address for you. Please click the link in that email to confirm that I do.”
There are two ways that you can then add your prospect to your email address:
- Inside Aweber when you are logged in by heading to Subscriber/Add New (the harder option) or
- By adding a form to a page on your website so that you can add someone effortlessly without logging into Aweber. I recommend the second option, so follow the advice below for creating a form and then add it to a new page which is easy for you to remember, such as www.yourdomainname.co.uk/email
Marketing DNA Nurture Businesses Marketing Process To Implement

You can see that unlike with the DNA Marketing Now sequence, some parts of the process above are missing:
- Step 1 – the form on your website so that people can add themselves to your database;
- Step 2 – the page on your website asking them to click the link in the email from step 3 to ensure that they receive the free guide; and
- Step 5 – the email sending the free guide/video or other resource are currently missing, so let’s put them in place in the order that it happens above.
Setting Up Your Website Form
Even if you don’t think that you are going to offer a free guide/video/book on your website at this point (because you offer a Marketing DNA Now service), you need a form on your website so that you can add prospects to your email list while you are on the telephone with them or when you meet them at shows or networking events.
This is how you create that form.

1 – Select ‘Sign Up Forms’
2 – Select ‘Create a Sign Up Form’
You will now be presented with this page:

1 – I recommend starting with a ‘Simple’ form as it will work on most websites, whatever your brand colours. You can always change this later.
2 – The Aweber default is to simply have one ‘Name line’ for the forename and surname. I recommend changing this. Click on the name box and this pop up appears:

Select “First & Last Name” then “Save Field”. This will allow you to be as formal or informal as you like going forwards.
3 – Submit is a dreadful word to put on a button. I know this because I have tested it and it consistently performs terribly. Change this to any of these which I know work much better “Send” or “Send My Free Guide”.
4 – You may choose to keep this for those worried about GDPR, but you really do not need to as Aweber is a double opt in email service.
5 – You definitely do not want to do Aweber’s marketing for them, so delete this line. Hover over “Powered by Aweber Email Marketing” and the word “Delete” will appear, allowing you to remove it.
6 – Save your form then once save, select “Go to step 2”.
You will then be presented with this page:

1 – Name your form, for example, ‘Free Guide’ or ‘Client Email List’ if the form is only for you to use to add clients whilst on the phone with you.
2 – Select ‘Custom Page’ from the ‘Thank You Page’ drop down. Create a page on your website like the one I use below and enter the URL of that page in this box:

3 – ‘Save Your Form’
4 – Click ‘Go To Step 3’.
You will now be presented with these options:

If you have WordPress or a similar website system, it is incredibly easy to add the form to your page.
Simply select ‘I Will Install My Form’, copy the javascript code as shown below :

Then simply paste this code wherever you want it to appear on your website. If using WordPress, ensure that you are viewing the ‘Text’ edit page before you paste the code in, not the ‘Visual’ page or it will not load the form.
Update your page and your form will be live, as shown below:

If you are going to ask your website developer to do this for you, simply choose ‘My Web Designer Will Install The Form’ and email the code to him or her.
Now that you have created your website form, we need to do the following.
Finish Basic List Set Up Options
To complete the remaining elements of the list, before moving onto the fun part of sending the automated emails, select ‘List Options’ as shown below:

The basic information you have already completed earlier in this process (List Name and Description), so let’s move onto the new part:
1 – This is the fun part. Add your name and email address here so that every time someone is added to your email list by downloading a guide from your website (I will show you how to do that bit shortly) you will receive an email telling you this. I have been email marketing since 2004 and I STILL get excited when I receive these emails; one more person I may be able to help has entered my little world – I love that! You will soon too if you do not already have this in place.
2 – Save your settings.
Next, select “Confirmation Message” from the page that you are still on (once you have saved your changes as described above).

At the bottom of this page you will now see this section:
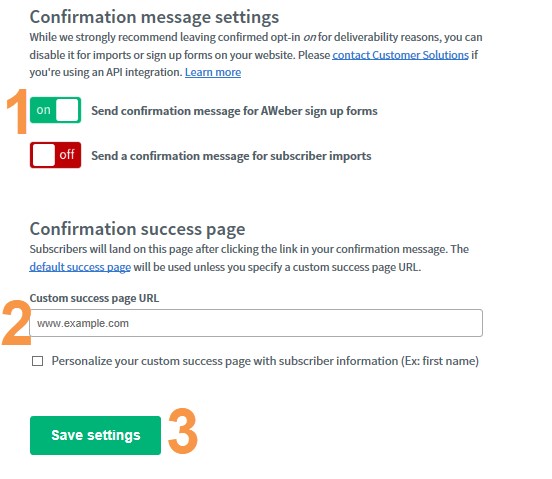
1 – Ensure that the first box is set to “on” so that your new subscribers receive your double opt in email asking them to confirm their email address before being added to your database. This will keep you GDPR compliant.
2 – The next part is important. If you leave it blank, when your new subscriber clicks the link in your email which says “Confirm my email” this is the page that they will be redirected:

This is the default Aweber Thank You page on their website at http://www.aweber.com/thankyou.htm.
Take a moment to think about your prospects’ journey at this stage, so that you realise why you do not want to leave these default settings in place.
First, they have found your website and have reached the point that they want to download your brilliant free guide in exchange for their email address (or you have added them whilst on the telephone with them). They enter their name and email address and are immediately sent your first email message, asking them to confirm their email address.
They click the “Confirm my email” button and are now sent to that Thank You page on the Aweber website.
That isn’t a very nice experience, is it?
It is much better if you can send them to a thank you page on your own website, so that the process feels much smoother.
This is the thank you page that people are sent to on my website which simply tells them that they have confirmed their email address. Some people try and sell from these pages but I firmly believe that you have to nurture the relationship before you do that, so I keep it nice and simple:

You should create your own version of this page and add it to a URL such as www.yourwebsite.co.uk/thank-you.
Now you are nearly there. What is missing? The email sending your free guide, so let’s do that now.
Setting Up Automated Emails
This is the fun part. This is where you can add emails which once added will go to everyone who downloads the guide in the future (write this email once, send it 1,000 times – leveraged marketing at its best).
To do this, from the “Messages” tab, select “Drafts” as shown below:

Now, before we create your first email(s) let me share one of the most important marketing messages with you:
If you want your email marketing to be successful, every email that you send should look like it has been sent by you personally.
It should look like an email that you would send to your partner about grabbing a bottle of wine on the way home.
It should not be branded or full of images because this immediately does two things:
- If it makes it past your spam filter (the images make it less likely to do so) more likely than not your email provider will strip out all of the images making it look very ugly; and
- As soon as your prospect sees your logo he or she knows that you are just trying to sell to them.
So we need your emails to look very nice, plain and simple, just like the ones you send from your phone of preference.
With this in mind, let me show you how to set up a plain looking email.
First, “Create A Message” from numbered point 1 in the image above.
You will now be presented with this page:

1 – Enter your subject line. Remember this must always give a reason for me to open your email. As this is the first email that they will receive, this can be as simple as “Your Free Guide Is Here” if you are a Nurture service, or if you are a Now service and simply want to add them to your email database, all it needs to say is “Thank you for confirming your email address”.
2 – If you are good at coding. you can code directly into the Source file. Otherwise you can use the visual editor which Aweber defaults to when you create a new message.
3 – The ‘first name fix’ code will automatically pull in your clients first name. You can insert this code by clicking on ‘personalise’ below button 8 from the image above and you can choose first name, last name or full name there.
4 – Insert the name of your guide or other ‘item of value’ here.
5. If you are sending a free PDF guide, my advice is that rather than attaching it to the email, include a link to a page on your website where your prospects can download the guide. This will reduce the chances of your guide going into the spam folder but more importantly, when you update the free guide in the future, you only have to edit this one page on your website rather than several emails linking to it. To insert the link to the page on your website, highlight the words “Link to a page on your website”, replace them with your chosen words such as “Click here to download your guide” then, with those words linked, click on the link button (number 6), drop in the link and you are good to go.
If you are simply adding a prospect to your email list as a Marketing DNA Now service, simply edit the wording in the first email to thank your prospect for confirming their email address.
7 – Edit your name and contact details to complete the email
8 – You can now send a test email to yourself to check that it is working as you would like by clicking ‘Preview & Test’.
9 – Once you are happy, save your email before completing the final steps below.
10 – Repeat this process for as many emails as you would like in your follow up sequence. If you are a Marketing DNA Now business and are not sending out a free guide, you do not need to do this next part as you only need to create one message which you can then copy and paste each month to form the basis of your weekly or monthly email. Skip forward to ‘creating a broadcast message’ after the campaigns part.
If you are a Marketing DNA Nurture business, I recommend 6 to 8 emails which merely on some of the points you have already covered in your guide, but if that idea fills you with fear at this point, don’t let that stop you completing this process. You only need one email in there to start this process and to be able to start growing your email database, so if you only have time to do that one now, do that one, then make a note to come back and add others on a weekly basis by following the process below.
The easiest way to create your next email is simply to click copy (image below) straight after you have saved your first email and this will instantly copy your next email to the list, until you have created as many as you would like. You can then edit them individually now or at a later date, but as I say don’t let it stop you getting your free guide up and running on your website today!

Creating Your First Campaign
Your first email sending the link to the free guide (along with any other follow up emails that you have created) now needs to be placed into a ‘Campaign’ in order to ensure that it is automatically sent to your new subscribers.
Select the ‘Messages’ navigation and then ‘Campaign’ as shown in the image below:

From the pop up, select “Blank” campaign as circled below:

Give your campaign a name when asked to do so, before selecting “On Subscribe” from the campaign editor as shown in the next image:

You will now be presented with this screen.

Following the orange numbers, complete the following steps:
1 – Select “Source is webform” for how people are coming into this campaign.
2- This is where you will drag items into your campaign.
3 – If you only have one message prepared for now, simply drag that across into the gap at 2. If you have more messages ready for your follow up sequence, drag a blank ‘Send a Message’ block across for each of them.
4 – Drag across a ‘Wait’ icon after each message. This will be the period of time before the person on your list receives your next message.
5 – At the end of all of your messages, drag across a ‘Tag’ which is where you will apply a tag, for example called “Finished Free Guide Download Emails” so that you can move them into your monthly or weekly email sequence.
Once you have finished, you should have a sequence that looks something like this:

Once you have saved your new Campaign, all you need to do is to activate it.

Select the blue drop down “Draft” from the image above and click ‘Activate’ and you are done!
The final thing to do is to take yourself through this entire process so that you can see what your prospects are going to go through. Go to the page on your website where you have added the form and add your details to it so that you can see what happens.
If you also want to add people to your regular monthly or weekly email marketing list so that they hear from you consistently, there is one more step to do.
Automatically Adding New Download Subscribers To Your Weekly/Monthly Email List
Whilst your new subscriber is going to receive a few emails from you sending them your guide, you also want to be able to keep in touch with them on your weekly or monthly emails.
This can be automated.
Create your weekly or monthly email marketing list by following the steps above (it will be much easier the second time I can assure you) as far as to the Campaign creation part (you do not need this part).
I do this and the list I move people into his called npj-more-clients-monthly as you will see below.
To add clients to your equivalent list, head to List Options and List Automation as shown below:

1 – Choose ‘Subscribe to list [your weekly/monthly list name]’ from drop down 1.
2 – Select the list name of your free download guide at numbered point 2 and then press Save Automation Rule in green to complete the automation process of adding them to this list.
Remember, you need to be in the list that you want to copy people into when they download your guide for this to happen (as circled in red in the image above).
Now that you have done this, let me show you how to send your weekly or monthly email messages (which is more straightforward than sending your guide in Campaigns).
Creating A Broadcast Message
This is a relatively straightforward part of the process as you have already created one draft email now. All you need to do is to add the content to it which is the basis of your broadcast message, then schedule it to be sent.
Here are some prompts/reminders:

Once you have added the content for your email newsletter (see Module 2), you now need to schedule your email to be sent to your audience.

Select ‘Send Options’ from the image above to send your message.
You will then be presented with this screen:

If you simply want to send the message immediately, click ‘Send Message Now’ in the green bar and it will be sent for you.
If you want to schedule it for a later date, click the blue ‘Edit’ button and enter the time that you would like to be emailed.
My preference is 11am on Tuesdays and Thursdays as that seems to get me the best open rates.
Once you have sent your first broadcast message, it is very easy to repeat the process each month.
All you need to do is to head to ‘Messages/Broadcasts’ from the navigation, then select ‘Copy to Drafts’ from your last Broadcast message and you have a message to edit and send again.
Repeat this process every week or month to send your latest email to your ever growing email list.
You Have Done It!
Well done! You now have an email marketing database, a way to add people to it from your website and you know how to send weekly or monthly emails!
Now that you have everything you need at your disposal, why not sign up for Aweber now?
Click here to sign up for Aweber and get started:>>
My Email Marketing Guide
I am not one for regrets generally, but when it comes to email marketing my only regret is that I did not start doing it sooner. It was approximately 12 months into my business before I really started, and then my business took off dramatically.
Let me assure you that if you haven’t yet started your email list, or you have started it but don’t really know what to say, this guide will get you up and running faster than a squirrel running up a tree being chased by a Jack Russell!
It covers all of the following:
- How to set up the software in the most effective way to generate as many sign ups as possible for you (in minutes)
- How to come up with subject titles (including 30 ideas to get you started)
- How to write the content AS YOURSELF the easy way
- How to build relationships with your emails
- How to sell without selling
- How to be the only business that your prospects turn to when they need the services that you provide
Warning: Email marketing can seriously improve the profitability of your business like it did mine.
Click the button below to download it now and get started: